On this page I will show you the various steps I have gone through to create some of my paintings.
Enjoy! If you are a beginner at the "arts", I hope this will be of help to you. As I was learning the business of art, I just hated books that included in their titles, "Complete Guide to..." because they often were not complete.
They usually did not show the various steps and techniques they went through to achieve the finished piece of art.
This demo is one of my latest paintings, "A Parrot's Paradise”.
Step 1
 Once I work out my idea for my painting I create a detail pencil sketch of the painting. I use photos as references to compose my idea. This painting is 16 inches by 20 inches and is painted on Masonite board with acrylic gesso as the ground. I apply the gesso in several thin layers and sand each layer when dry. I like to have a smooth surface.
Step 2
 Usually after the final gesso layer is readied I will trace the pencil sketch on the Masonite. I use a sheet of paper covered with graphite from a number 2 pencil. I some times use chalk on paper to trace on the painting while I am in the process of painting. It rubs of easily and doesn’t leave trace lines in the painting.
You can fix the graphic tracing by applying a thin layer of acrylic medium over it.
I often tint the last gesso layer so that it is not pure white. This helps you control the tonal range of your painting. Other wise you are always fighting the contrast of white against any color you apply. You can either tint your gesso or apply a color wash over your graphite transfer.
I did a quick and loose wash by swirling the brush creating bubbles and letting them burst on their own. You must thin the color to a great degree to make this work. You also can add a touch of soap to help create the bubbles. This is a great method to create rock surfaces.
Step 3
 Once I have the background and the tracing done I begin to paint in the dark elements of the painting and then the lighter ones.
Step 4
 The next step I painted a general color on the parrot and the glyphs which I did after I shot this picture. I find that in acrylics, if you want to get quicker results in painting objects, if you paint the middle-toned general color of the object first. Then paint with glazes to darken or lighten colors in the object in a controlled manner.
Step 5 As you can see I have started painting the lighter tones on the parrot. I must say that I had to back track a little on the background. I found that the stone work was becoming confused so I over painted it with general colors just like I did with the parrot in the previous step above. I then retraced the basic drawing again on the over painting and proceeded painting the darker tones first and the lighter tones last.
In order to keep the colors in the stone work consistent I premixed colors for the different tones in large enough quantity to be able to complete the painting with them. I then could alter these colors with addition of white, black, or another color to add interest and keep the painting from becoming static.
Step 6
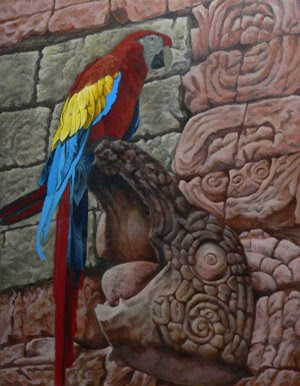 In step 6, I show you the retracing with chalk on the parrots wings and other feathers so I can more accurately create the birds detailed features. Besides using a sheet of paper covered with chalk I also used a white chalk pencil to draw details as well.
Step 7
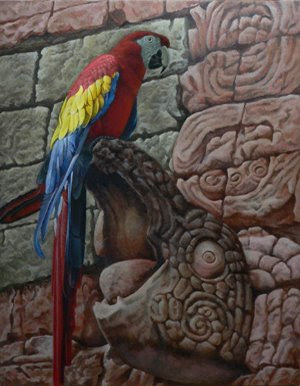 In this step you see that the parrot is basically completed. I continued working on the stone work adjusting details and contrasts.
Step 8
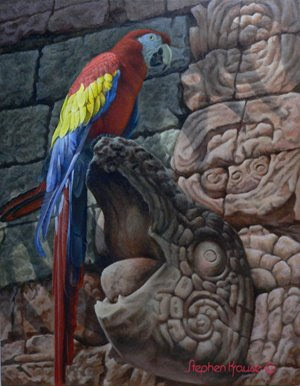 Here you see the finished painting. You will notice that I have done more work on the stone work and the parrot. I have also added a shadow pattern of palm leaves on the stone work to add drama and to balance with the stone head at the bottom of the painting. By the way the stone head that the parrot is resting on is a representation of a parrot done by a Meso-American Artist many years ago.